This post may include affiliate links.
If you make a purchase, I'll earn a small fee at no extra cost to you.
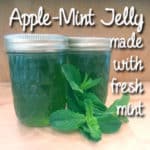
Apple-Mint Jelly, straight from the garden, has a fresh, zippy taste that’s so much better than the store version.
A few years after I got married, Grandma had me come over so I could learn how to make jelly. Hubby especially likes her Apple-Mint Jelly, so that was on the top of my list. I was surprised to find that she used peppermint flavoring from the store, since mint is so easy to grow!
Her recipe (and a big crop of mint) inspired me to make this version of Apple-Mint Jelly, straight from the garden. It has a fresh, zippy taste that’s so much better than the store version.
Tools Used to Make Apple-Mint Jelly with Fresh Mint
Canning Kit: this collection of canning tools will making canning much easier
Canning Pot: the best pot for water-canning jams and jellies
Half-Pint Canning Jars: the perfect sized jars for making jelly
Daterra Cucina nonstick saucepan: for even heating and easy cleanup
How to Make Apple-Mint Jelly with Fresh Mint
Ingredients:
2 cups roughly chopped mint leaves
3 1/4 cups apple juice
1/2 teaspoon lemon juice
1/3 cup pectin
3 1/2 cups sugar
Green food coloring (optional)
5 half-pint canning jars, new lids, and rings
Canning pot and kit (buy it here)
Prepare your canning pot and jars
Fill the pot half-full of water, put the rack inside, and put it on a back burner to warm while getting the jelly ready. It takes a while for that much water to get hot!
You’ll also want to sterilize the jars, lids, and rings (I run them through the dishwasher without soap). Keep the jars warm and put the lids into a bowl of very hot water.
Make the jelly
Put the mint leaves in a saucepan, add the apple juice, and bring to a boil. After it boils, turn off the heat and let the mint sit in the apple juice for 10 minutes. This will allow the mint flavor to infuse into the juice.
Strain the liquid (I used a coffee filter) and measure 3 cups of liquid. If you end up with less than 3 cups, top it off with a bit more apple juice.
Put it back in the saucepan over medium heat. Add the lemon juice and 4 drops of food coloring. (I’m not usually a fan of food coloring, but without it your jelly will look suspiciously like a urine sample. Just sayin’.)
Whisk in the pectin, and bring the mixture to a boil. Then whisk in the sugar, and boil hard for 2 minutes. A hard boil means that even if you stir it, the bubbles don’t stop.
While the jelly is boiling, get your jars out and put them on the counter near the stove. When the jelly has finished cooking, use the canning funnel and pour the jelly into the jars, leaving 1/4 inch headspace (fill them to 1/4 inch from the top). Wipe the rim and threads of the jar with a clean cloth to ensure there’s no residue that will keep the jars from sealing.
Process the jelly
Set the lid on the jar (I use the magnet from my canning kit) and screw the ring on fingertip-tight. Load the filled jars into the canner one at a time using the jar lifter. Don’t tip the jars, or you might compromise the seal and spoil your jelly.
Add boiling water if needed so the water level is at least an inch above the jar tops. Turn the heat to high and cover the canning pot.
When the water comes to a boil, set the timer for 10 minutes. Keep the pot covered. You can lower the heat a little, as long as the water is boiling the entire time.
After 10 minutes, remove the lid and remove the jars one at a time, using the jar lifter. Place the jars onto a towel or cooling rack, leaving at least one inch of space between the jars. Don’t put the jars on a cold counter–they might break.
Let the jars sit undisturbed while they cool. You’ll hear a delightful “ping!” from the jars as they cool and seal. This could happen within minutes, or it could take several hours. Keep the kids away, and don’t tighten the rings until the jars are completely cooled.
Enjoy!
Serve with lamb, in thumbprint cookies, or on English Muffin bread!
Apple-Mint Jelly with Fresh Mint
Ingredients
- 2 cups roughly chopped mint leaves
- 3.25 cups apple juice
- 1/2 tsp lemon juice
- 1/3 cup pectin
- 3.5 cups sugar
- green food coloring , (optional)
Instructions
Prepare your canning pot and jars
- Fill the canning pot half-full of water, put the rack inside, and put it on a back burner to warm while getting the jelly ready. It takes a while for that much water to get hot!
- You’ll also want to sterilize the jars, lids, and rings (I run them through the dishwasher without soap). Keep the jars warm and put the lids into a bowl of very hot water.
Make the jelly
- Put the mint leaves in a saucepan, add the apple juice, and bring to a boil. After it boils, turn off the heat and let the mint sit in the apple juice for 10 minutes. This will allow the mint flavor to infuse into the juice.
- Strain the liquid (I used a coffee filter) and measure 3 cups of liquid. If you end up with less than 3 cups, top it off with a bit more apple juice.
- Put it back in the saucepan over medium heat. Add the lemon juice and 4 drops of food coloring. (I’m not usually a fan of food coloring, but without it your jelly will look suspiciously like a urine sample. Just sayin’.)
- Whisk in the pectin, and bring the mixture to a boil. Then whisk in the sugar, and boil hard for 2 minutes. A hard boil means that even if you stir it, the bubbles don’t stop.
- While the jelly is boiling, get your jars out and put them on the counter near the stove. When the jelly has finished cooking, use the canning funnel and pour the jelly into the jars, leaving 1/4 inch headspace (fill them to 1/4 inch from the top). Wipe the rim and threads of the jar with a clean cloth to ensure there’s no residue that will keep the jars from sealing.
Process the jelly
- Set the lid on the jar (I use the magnet from my canning kit) and screw the ring on fingertip-tight. Load the filled jars into the canner one at a time using the jar lifter. Don’t tip the jars, or you might compromise the seal and spoil your jelly.
- Add boiling water if needed so the water level is at least an inch above the jar tops. Turn the heat to high and cover the canning pot.
- When the water comes to a boil, set the timer for 10 minutes. Keep the pot covered. You can lower the heat a little, as long as the water is boiling the entire time.
- After 10 minutes, remove the lid and remove the jars one at a time, using the jar lifter. Place the jars onto a towel or cooling rack, leaving at least one inch of space between the jars. Don’t put the jars on a cold counter–they might break.
- Let the jars sit undisturbed while they cool. You’ll hear a delightful “ping!” from the jars as they cool and seal. This could happen within minutes, or it could take several hours. Keep the kids away, and don’t tighten the rings until the jars are completely cooled.