Natural strawberry fruit leather is a big improvement over the packaged version! Make it in the oven or dehydrator.
It’s strawberry-palooza time! Thanks to a great price at the roadside fruit stand, this weekend I made strawberry jam, strawberry pancake syrup, and strawberry fruit roll-ups.
This homemade strawberry fruit leather recipe is so easy, you won’t believe it. The idea and technique come from the fantastic book, Healthy Snacks to Go. Remember those delicious homemade granola bars? Yep, same book!
Tools Used to Make Homemade Fruit Leather Recipe
Blender: my favorite tool for quick and perfectly blended and smooth strawberries
Nesco dehydrator: it dries food at low temperatures, helping preserve the enyzmes from the fruit and honey
Homemade Fruit Leather Recipe
Ingredients:
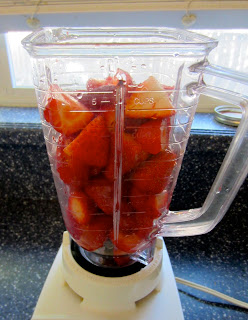
Blender full of strawberries, washed and hulls trimmed (about 4 cups)
1 tablespoon raw honey (optional)
Plop the strawberries in the blender and add the honey. Don’t add any water! Just smoosh the berries down a bit so they’ll engage with the blades.
Give extra strawberries to your supervisor to flavor test while you’re working.

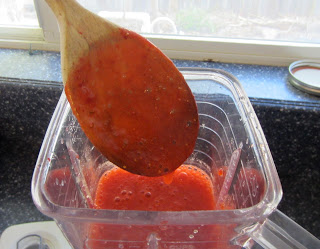
Blend the berries until they become a smooth liquid.
Now you’re ready to go! Either pour the liquid onto a Silpat and bake at 200 F for about 3 hours, or use a dehydrator. I tested out my sister-in-law’s Nesco American Harvest machine for this. Because it dries food at very low temperatures, it preserves the enzymes of the fruit and raw honey.
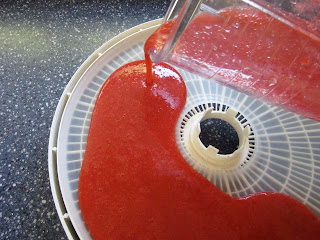
Pour a layer about 1/4 inch thick on the fruit leather tray. Set the dehydrator to 135 F and let ‘er rip.
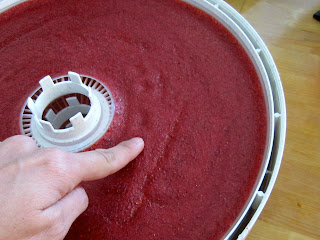
Since it’s cooking at such a low temp, it will take a while to be ready. I checked it after 3 hours. See the cracks near my finger? It’s drying, but isn’t ready yet. You can tell because touching it leaves pokey-finger-dents (that’s a technical term).
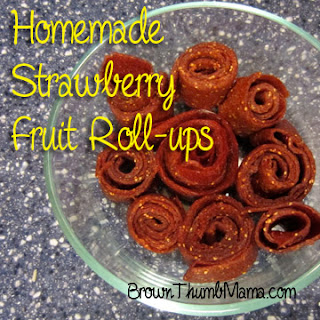
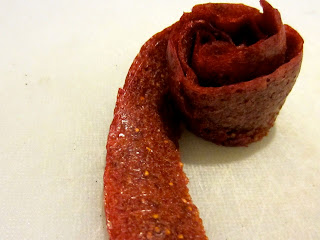
After 6 hours, it was finally ready. It peeled up in a nice, even sheet and sliced it into ribbons with a pizza cutter. They kind of look like strawberry roses!
Oh, and let me show you something. This is right from General Mills’ website.
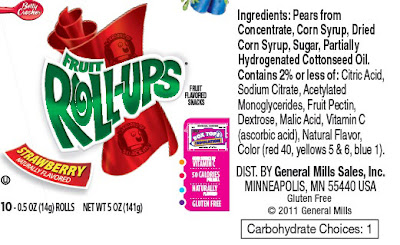
Hey, Betty! Betty Crocker! You forgot the strawberries.
Want more easy, super-healthy snack recipes? Check out the expanded second edition of Healthy Snacks to Go. This is an 85-page book full of tips and recipes for 45 different snacks like:
- 15 different “Larabar” recipes
- Crispy Roasted Chickpeas
- Peanut Butter Kisses
- and of course, granola bars and fruit roll-ups.
Give it a try—we’ve loved every recipe we’ve made from it!
Homemade Fruit Leather
Ingredients
- 4 cups strawberries, washed and hulls trimmed
- 1 tbsp raw honey
Instructions
- Plop the strawberries in the blender and add the honey. Don’t add any water! Just smoosh the berries down a bit so they’ll engage with the blades.
- Blend the berries until they become a smooth liquid.
- Now you’re ready to go! Either pour the liquid onto a Silpat and bake at 200 F for about 3 hours, or use a dehydrator. I used a dehydrator because it dries food at very low temperatures, it preserves the enzymes of the fruit and raw honey.
- Pour a layer about 1/4 inch thick on the fruit leather tray. Set the dehydrator to 135 F and let ‘er rip.
- Since it’s cooking at such a low temp, it will take a while to be ready. I checked it after 3 hours. See the cracks near my finger? It’s drying, but isn’t ready yet. You can tell because touching it leaves pokey-finger-dents (that’s a technical term).
- After 6 hours, it was finally ready. It peeled up in a nice, even sheet and sliced it into ribbons with a pizza cutter. They kind of look like strawberry roses!